Developing Unity code outside of the Unity Editor

The Unity Editor is a great tool for developing your application and it relies on an external code editor such as Visual Studio, VSCode, or Rider to write your C# code. But sometimes, you may want to develop code outside of Unity altogether.
There are many reasons why you may want to develop outside Unity:
- You want to keep your code separate from the Unity project to keep things tidy and separate. For instance, your code can live in a separate GIT repository;
- You have a dev team dedicated to developing some features and want them to work on it on a different schedule;
- Your code may be used in other applications than Unity or in multiple Unity projects;
- You don’t want to share your source code.
Whatever the reason, separating different parts of your application can be a good practice. If it is developed separately, you can create a cleaner interface (i.e. API) and will be less likely to intertwine code meant for different purposes.
While writing this article, I will use Unity 2021.3, the latest LTS Unity version. Note, that .NET support may vary if you are using a different version of Unity and you may have to adjust what I describe here. I will also use Visual Studio 2022 as the editor.
First, we are going to develop an external API that will not use Unity specifics to show how you can integrate external .NET code, then we will use Unity libraries inside our external C# project.
Integrate external .NET code in Unity
Create Visual Studio Project
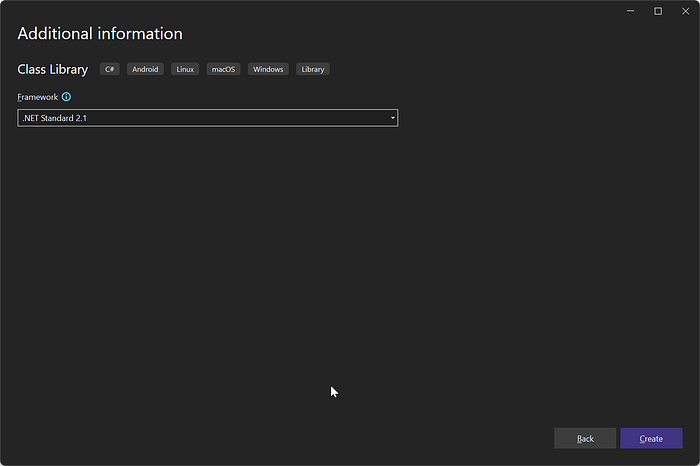
Start Visual Studio and create a new project. Then, select Class Library with .NET Standard target for the project type:

In the Additional information section of the wizard, select .NET Standard 2.1:

Press Create to create your new project.
Code and Build your Solution
Once created, you can write your code as you would with any Visual Studio project.
My simple project contains the following code:
namespace ExternalLibrary
{
    public class MathExtension
    {
        public static int Fibonacci(int n)
        {
            if ((n == 0) || (n == 1))
            {
                return n;
            }
            else
                return Fibonacci(n - 1) + Fibonacci(n - 2);
        }
    }
}
Select Debug or Release as your solution configuration depending if you want to be able to debug your DLL:

Compile your code and navigate to your Bin directory. You will find the compiled DLL:

Use DLL in Unity
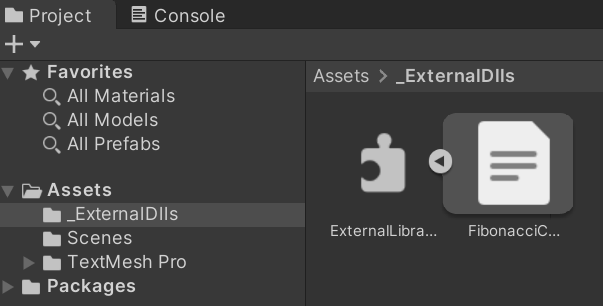
Go to the Unity Editor, then drag and drop the DLL somewhere in the Assets folder of the Project panel:

Unity should take a few seconds to Reload script assemblies and then you are ready to go.
By default, the added library targets any platform. If you want to restrict to a specific platform or want to change some configuration, select the DLL and adjust the settings in the Inspector window:

You can then use your library like any code inside Unity.
For instance, my code uses the DLL like this:
using ExternalLibrary;
using TMPro;
using UnityEngine;

public class CaculateFibonacci : MonoBehaviour
{
    int value = 0;
    public TMP_Text textField;

    public void Calculate()
    {
        var result = MathExtension.Fibonacci(value);
        textField.text = $"Fibonacci of {value} is {result}";
        value++;
    }
}
Note, the using ExternalLibrary statement and the Fibonacci method. They are all coming from the external DLL.
Using Unity libraries outside the Unity environment
Adding dependency & building
If your code depends on Unity libraries, you need to reference those dependencies inside your Visual Studio project. That also means you will have to use the Unity runtime with your final application so you may not be able to use your code outside Unity.
In your Visual Studio project, right-click Dependencies in the Solution Explorer and select Add Project Reference…:

Click on Browse… and navigate to your Unity Editor installation folder then to the Editor\Data\Managed\UnityEngine folder. For instance:
G:\Software\UnityEditors\2021.3.16f1\Editor\Data\Managed\UnityEngine
Then add the UnityEngine.dll. You will now have the following dependency:

You can now use the Unity API within your project:
using UnityEngine;

namespace ExternalLibrary
{
    public class FibonacciComponent : MonoBehaviour
    {
        public int Value { get; private set; } = 0;
        public int Result { get; private set; }

        public void Calculate2()
        {
            Result = MathExtension.Fibonacci(Value);
            Value++;
        }
    }
}
In this example, I inherit from the MonoBehaviour class which is a Unity API.
Once I compile the project, I will get my DLL plus all the dependencies listed in the bin folder:

Copying to the Unity Editor
Note that I don’t need to copy the UnityEngine.dll in the Unity project as it already exists by default.
Also, if I copy my DLL in the Unity Editor in the same Asset folder, it will not replace the existing one but create a new one “ExternalLibrary 1.dll”. Note the “ 1” appended at the end of the file name. This is not what we want!
You have 2 solutions here:
- Delete the previous DLL, and then added the new DLL. If you do this, all the settings in the Inspector window are lost and you will have to recreate those;
- Quit the Unity Editor, replace the DLL and start the editor again. When loading the project again, it will automatically refresh the DLL and the settings will be preserved (they are stored in a .meta file that was not deleted).
There is no ideal solution. If you haven’t changed the settings, 1. is the preferred method. Otherwise, 2. is a good solution when loading the project does not take too long!
As my DLL now contains components, I can press the arrow next to the icon and see a list of available components:

I can now reference my code as if it had been developed directly in the Unity project:
using ExternalLibrary;
using TMPro;
using UnityEngine;

public class CaculateFibonacci2 : MonoBehaviour
{
    public TMP_Text textField;
    public FibonacciComponent calculator;
    public void Calculate()
    {
        calculator.Calculate2();
        textField.text = $"Fibonacci of {calculator.Value} is {calculator.Result}";
    }
}
In this example, I am referencing the FibonacciComponent which is a MonoBehaviour component that has been developed outside Unity!
More Info
I hope this article gave you a good introduction in how to develop and integrate external DLLs in Unity.
Happy coding!